Refurbishing a laptop means restoring a used device to reliable, like-new performance through inspection, deep cleaning, repairing or replacing faulty parts, upgrading hardware (like SSD or RAM), installing a fresh operating system, and fully testing it.
In 2026, a properly refurbished laptop can deliver 80–90% of new-device performance at 40–60% lower cost. It also extends device life by 3–5 years and reduces electronic waste, making it a smart, sustainable choice for students, professionals, and businesses.
Giving Your Laptop a Second Life
Over 50 million laptops are discarded globally each year simply because they run slowly. Most of these devices can be brought back to life. Refurbishing a laptop means cleaning it deeply, fixing broken parts, upgrading key components, and installing fresh software. This process takes an old or sluggish machine and makes it work like new again.
This guide walks you through how professionals refurbish laptops. You’ll learn each step from first inspection to final testing. Whether you want to save money, help the environment, or understand what “refurbished” really means, you’ll find clear answers here. The process can extend your laptop’s life by several years while cutting costs significantly.
Table of Contents
What Does Refurbishing a Laptop Mean?
Definition and Core Concept
Refurbishing means bringing a used laptop back to good working condition. The process includes testing, cleaning, repairing broken parts, upgrading hardware, and installing a fresh operating system. A refurbished laptop has been checked and certified to work properly.
Here’s how different laptop conditions compare:
Condition | What It Means | Testing Done |
Used | Sold as-is with no repairs | None |
Refurbished | Tested, repaired, and certified | Complete diagnostics |
New | Fresh from factory | Factory quality checks |
Who Refurbishes Laptops?
Several types of professionals handle laptop refurbishment:
- Certified refurbishers like Microsoft Authorized or Apple Certified technicians
- Manufacturer programs that refurbish their own brand laptops
- Third-party repair shops with trained technicians
- Individual users who have technical skills (DIY approach)
Refurbishment Standards
The industry uses a grading system to show laptop condition:
- Grade A: Looks almost new with barely visible wear
- Grade B: Works perfectly but has minor scratches
- Grade C: Fully functional with visible cosmetic damage
- Grade D: Works well but shows heavy use marks
Understanding these differences between refurbished and used laptops helps you know what to expect from each grade.
The Complete Refurbishment Process: Step-by-Step
1. Initial Assessment and Inspection
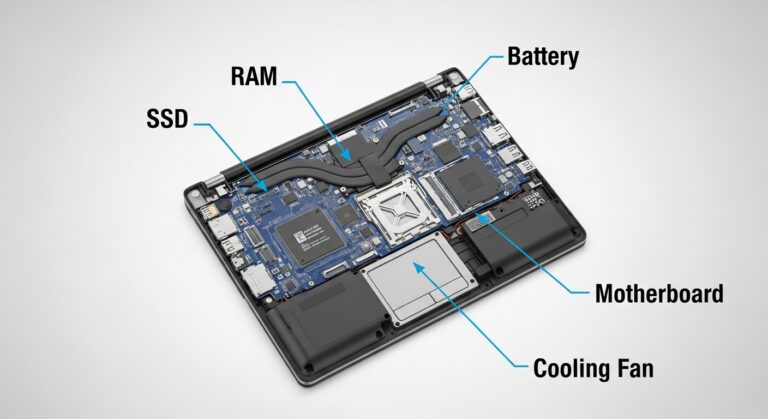
Every refurbishment starts with thorough testing. Technicians check all hardware components to find problems:
Hardware tests include:
- CPU and RAM performance measurements
- Battery health and how long it holds charge
- Screen inspection for dead pixels or cracks
- All ports checked (USB, HDMI, headphone jack)
- Keyboard and touchpad response testing
Software checks cover:
- Boot speed and BIOS access
- Current operating system condition
- Existing errors or failures
Recent data shows that proper initial diagnostics can identify 87% of laptop issues before repairs begin. This inspection creates a repair list showing what needs fixing or replacing.
2. Deep Cleaning and Dust Removal
Dust and dirt slow down laptops and cause overheating. Research indicates that laptops accumulate enough dust within 12 to 18 months to reduce cooling efficiency by up to 40%. Deep cleaning removes years of buildup.
External cleaning steps:
- Screen wiped with soft microfiber cloth
- Keyboard and touchpad cleaned carefully
- Ports and air vents cleared of debris
Internal cleaning requires:
- Opening the laptop case safely
- Compressed air blown through fans and cooling fins
- Dust removed from motherboard and components
- Old thermal paste cleaned from processor
Essential cleaning tools:
- Compressed air canister (large size works best)
- Microfiber cloths that don’t scratch
- Isopropyl alcohol at 90% or higher strength
- Anti-static brush for delicate parts
3. Component Repair and Replacement
Broken or worn parts get replaced with working ones. According to recent refurbishment industry reports, these are the most common replacements:
Battery: A new battery goes in when the old one holds less than 80% charge. Modern lithium-ion batteries typically degrade to this level after 500 to 800 charge cycles. This restores hours of portable use.
Hard Drive: Failing mechanical drives (HDD) are swapped for solid-state drives (SSD). This single change makes the biggest speed difference. Current SSD prices have dropped 60% compared to five years ago, making this upgrade more affordable than ever.
RAM: Memory upgrades to 8GB or 16GB help the laptop run multiple programs smoothly. Studies show that upgrading from 4GB to 8GB RAM improves multitasking performance by approximately 65%.
Screen: Cracked or dim displays get replaced with new LCD or LED panels.
Keyboard: Individual keys or entire keyboards are swapped when keys stick or don’t respond.
Thermal Paste: Fresh paste goes on the CPU and GPU to improve heat transfer and cooling. Quality thermal paste can reduce processor temperatures by 10 to 15 degrees Celsius.
Technicians prefer OEM (Original Equipment Manufacturer) parts because they fit perfectly and work reliably. Quality third-party parts also work when OEM parts aren’t available.
4. Hardware Upgrades for Performance
Beyond repairs, upgrades boost speed and capability:
SSD installation provides the most dramatic improvement. Boot times drop from minutes to seconds—often 3 to 5 times faster. Programs open instantly. Everything feels more responsive. Recent benchmarks show that NVMe SSDs can achieve read speeds up to 7,000 MB/s compared to 150 MB/s for traditional HDDs.
RAM expansion helps when running many browser tabs, editing photos, or working with large files. More memory means smoother multitasking.
A Wi-Fi card upgrade brings faster internet speeds with newer standards like Wi-Fi 5 or Wi-Fi 6.
Upgrade | Performance Impact | Cost Level | Speed Improvement |
SSD | Very High | Moderate | 3-5x faster |
RAM | Medium | Low | 40-65% smoother |
Battery | Essential for portability | Moderate | Restores mobility |
Wi-Fi Card | Improved connectivity | Low | Up to 3x faster |
Learn more about which laptop upgrades give the best performance boost for your specific needs.
5. Software Reset and OS Installation
Old software gets completely wiped away. A fresh start removes viruses, bloatware, and corrupted files.
Data wiping involves:
- Secure erase tools that overwrite data multiple times
- Formatting all storage partitions
- Ensuring no personal information remains
Operating system installation:
- Windows 10 or 11 installed fresh
- Linux options like Ubuntu or Mint for different users
- macOS for Apple laptops
Current industry standards recommend at least a 3-pass data wipe to meet data security compliance requirements.
Driver installation completes the setup:
- Chipset drivers for core hardware
- Graphics drivers for display performance
- Audio and network drivers for connectivity
- Manufacturer utilities for special features
6. Quality Assurance and Testing
Before finishing, extensive testing proves everything works correctly.
Performance tests measure:
- How fast the system boots
- CPU and GPU stress testing under heavy load
- RAM diagnostic scans for errors
- Storage speed tests for read and write performance
Functionality checks verify:
- Every USB port transfers data
- Wi-Fi and Bluetooth connect properly
- Audio output and microphone input work
- The webcam produces clear video
- Battery charges and discharges as expected
Burn-in period: The laptop runs continuously for 24 to 48 hours. Technicians monitor for overheating, crashes, or unexpected shutdowns. Industry data shows that 85% of hardware failures occur within the first 48 hours of testing, making this step critical.
Essential Tools and Materials for Laptop Refurbishment
Basic Tool Kit
Professional refurbishment requires specific tools:
- Precision screwdrivers in Phillips and Torx sizes
- Plastic pry tools (spudgers) that open cases without scratching
- Anti-static wrist strap prevents electrical damage to components
- Thermal paste syringe for proper CPU cooling
Cable organizer keeps small screws and parts sorted
Cleaning Supplies
- Compressed air canisters (large 10 oz or bigger)
- Isopropyl alcohol at 90% concentration or higher
- Multiple microfiber cloths
- Cotton swabs for tight spaces
- Anti-static brush for sensitive areas
Diagnostic Software
Free tools help test components:
- CrystalDiskInfo checks hard drive and SSD health
- MemTest86 scans RAM for errors
- HWMonitor tracks temperature and voltages
- Prime95 stress tests the CPU
Common Problems Fixed During Refurbishment
Performance Issues
Slow boot times: An SSD upgrade transforms boot speed from over a minute to under 15 seconds. Current data shows average boot time improvements of 70-85%.
System freezing: Usually fixed by adding more RAM or cleaning dust from cooling systems.
Overheating: Resolved by reapplying thermal paste and cleaning blocked air vents. Proper cleaning can reduce operating temperatures by 15-20 degrees Celsius.
Hardware Failures
Dead battery: New battery replacement restores portability and unplugged use time.
Broken screen: LCD or LED panel replacement brings back clear display.
Non-responsive keyboard: Individual keys or complete keyboard replacement fixes typing problems.
Failed hard drive: Data can sometimes be recovered before installing a new SSD.
Cosmetic Damage
Scratched casing: Light buffing or vinyl skin covers reduce visible wear.
Worn palm rest: Replacement parts restore clean appearance.
Faded keys: New key caps or clear stickers make letters readable again.
Loose hinges: Tightening screws or replacing brackets stops wobbling screens.
Software Problems
Malware or viruses: Complete wipe and fresh OS install removes all infections.
Bloatware: Clean installation eliminates unwanted trial software.
Driver conflicts: Updated drivers from manufacturer websites solve compatibility issues.
Corrupted operating system: Fresh installation creates stable foundation.
Types of Laptop Refurbishment
Full Refurbishment
Scope: Complete overhaul touching every component
Includes: Deep cleaning, all repairs, multiple upgrades, fresh OS
Best for: Laptops 3 to 5 years old with several problems
Outcome: Performance close to new condition
Component-Level Refurbishment
Scope: Targeted upgrades without full disassembly
Includes: SSD and RAM upgrades only
Best for: Slow laptops that otherwise work fine
Outcome: Major speed improvement with minimal work
Cosmetic Refurbishment
Scope: External appearance improvements only
Includes: Case replacement, screen polish, key replacement
Best for: Laptops with strong internals but worn exterior
Outcome: Looks much better without touching hardware
Software-Only Refurbishment
Scope: Operating system and software reset
Includes: Data wipe, fresh install, driver updates
Best for: Laptops with no hardware problems
Outcome: Clean system that runs like new
Benefits of Refurbishing vs. Buying New
Factor | Refurbished Laptop | New Laptop |
Cost | 35-60% less expensive | Full retail price |
Environmental Impact | Reduces electronic waste | New manufacturing creates pollution |
Reliability | Tested and certified working | Factory warranty included |
Customization | Upgrades match your needs | Fixed specifications |
Availability | Ready immediately | May need ordering time |
Warranty | 30-90 days common | 1-3 years standard |
Refurbishing offers real advantages:
- Saves significant money on comparable performance
- Reduces environmental impact from e-waste (one refurbished laptop saves 190 kg of CO2 emissions)
- Provides tested reliability through quality checks
- Allows custom upgrades for specific uses
Compare these factors against how long refurbished laptops typically last when making your decision.
Who Should Refurbish Their Laptop?
Ideal Candidates
- Students working with limited budgets
- Small businesses reducing IT equipment costs
- Environmentally conscious buyers reducing waste
- Users whose older laptop still meets their needs
- Tech enthusiasts who enjoy learning and DIY projects
When NOT to Refurbish
- Laptop is older than 7 to 8 years (outdated technology)
- Severe physical damage like bent frame or major liquid spills
- Motherboard failure (repair costs more than replacement)
- Need for latest features like newest ports or current-generation processors
DIY Refurbishment vs. Professional Services
DIY Refurbishment
Pros:
- Lower total cost (only parts needed)
- Learning experience builds technical skills
- Complete control over every decision
Cons:
- Risk of accidentally damaging components
- Takes considerable time (4 to 8 hours for beginners)
- No warranty on your own work
Best for: Tech-savvy users comfortable opening electronics
Professional Refurbishment
Pros:
- Expert testing finds all problems
- Warranty included (typically 30 to 90 days)
- Certified quality standards met
- Faster completion time
Cons:
- Higher cost includes labor charges
- Less control over specific upgrade choices
Best for: Users wanting guaranteed results without risk
Conclusion: Making Old Laptops Reliable Again
Refurbishing a laptop follows six clear phases: inspection, cleaning, repair, upgrades, software reset, and testing. This systematic process transforms slow or faulty laptops into reliable machines. The work saves 35 to 60 percent compared to buying new while extending device life by 3 to 5 years. It also reduces electronic waste and environmental impact.
Whether handled professionally or as a DIY project, refurbishment offers a practical alternative to replacement for laptops under 6 years old. Understanding this process helps you make informed decisions about laptop purchases and repairs. The knowledge empowers you to choose the right path for your needs and budget.
Frequently Asked Questions
Professional services need 2 to 5 days depending on repairs required. DIY projects take 4 to 8 hours for beginners or 2 to 3 hours with experience.
Yes, when the laptop is under 6 years old and repair costs stay below half the price of a comparable new model. Refurbishment extends usable life by 3 to 5 years.
Installing an SSD provides the biggest speed boost. Boot times become 3 to 5 times faster and programs respond instantly.
Most laptops can be refurbished successfully. Devices older than 7 to 8 years or those with motherboard damage often cost more to fix than replace.
Professional refurbishers typically include 30- to 90-day warranties. Manufacturer-refurbished units sometimes offer up to 1 year of coverage.